
Clean a CDU strainer screen when accumulated debris restricts coolant flow and the removable metal element remains undamaged. Replace the screen when the mesh, support, welds, or seating surfaces can no longer meet the required condition, or when approved cleaning cannot restore it. The correct decision depends on measured differential pressure, the element’s physical condition, and the maintenance limits specified for the installed coolant distribution unit (CDU).
This guide covers reusable metal screens in data center liquid-cooling strainers, including facility-water inlet installations. It explains how to recognize fouling, choose between cleaning and replacement, service the element, check the system after maintenance, and specify a compatible spare. Disposable cartridges require separate manufacturer-approved procedures.
When Does a CDU Strainer Need Cleaning?
Inspect a CDU strainer when its differential pressure reaches the approved service trigger, its flow performance changes unexpectedly, or the system reports a filter-related alarm. Clean the screen when inspection confirms deposits are restricting its openings and the element remains suitable for reuse. A calendar interval alone cannot account for changes in debris loading or operating conditions.
How Do You Measure Strainer Differential Pressure?
Calculate strainer differential pressure by subtracting the downstream pressure from the upstream pressure at measurement points spanning the strainer:
Strainer ΔP = upstream pressure − downstream pressure
For example, 30 psi upstream and 26 psi downstream gives a measured ΔP of 4 psi. This calculation identifies the pressure loss between those points; it does not establish that 4 psi is an acceptable value or a cleaning threshold. If the sensors also span other components, the reading is not the strainer’s pressure loss alone.
Compare the current reading with the clean-screen baseline recorded for the same assembly at a similar flow rate, coolant temperature, composition, pump state, and valve configuration. Higher flow or greater coolant viscosity can increase ΔP even when the screen is clean.
Which Operating Changes Require Investigation?
A rising ΔP at comparable flow is a useful fouling signal, but the measurement should be evaluated alongside flow, alarms, and system conditions. Use the following checks before scheduling service:
- ΔP rises while flow and coolant conditions remain comparable: Review the approved service limit and investigate solids accumulation.
- Flow falls or a low-flow alarm occurs: Check the strainer, but also examine pump status, valve position, instrumentation, and other restrictions.
- ΔP suddenly falls toward zero despite confirmed flow: Check the sensors, pressure taps, bypass path, and element integrity; a torn screen is only one possible explanation.
- Cleaning is required unusually often: Record the collected solids and investigate upstream contamination rather than automatically installing a finer screen.
There is no universal 5 psi, 10 psi, or three-month rule for CDU strainers. The service trigger must remain within the approved limits of the CDU, housing, element, and cooling circuit. Saifilter’s general pipeline-strainer specifications do not assign a single pressure-drop limit or cleaning interval to every configuration.
Should You Clean or Replace a CDU Strainer Screen?
Clean a reusable screen when fouling is the only problem; replace the affected element when its filtering layer, support structure, or sealing geometry is damaged or no longer meets the approved specification. Inspect the element after removing deposits, because solids can conceal tears, cracks, and deformation.
| Inspection result | Recommended action | Acceptance check |
| Mesh or perforations are blocked, but the element is intact | Clean, then inspect for reuse | Openings are clear and the element remains structurally sound |
| Woven mesh is torn, punctured, or separating from its support | Replace the damaged element | Required aperture, attachment, support, and fit are restored |
| Perforated support is buckled, a weld is cracked, or an end fitting is distorted | Remove the element from service and replace the damaged part | Geometry and allowable mechanical loading meet the approved design |
| Gasket is damaged or sealing surfaces are compromised | Replace the seal or affected component as appropriate | Material compatibility and sealing surfaces are confirmed |
| Screen appears clean, but ΔP or flow remains abnormal | Troubleshoot before replacing parts | Measurement and operating conditions are checked |
A metal screen may be reused after more than one cleaning if it continues to pass inspection. It should not be reused simply because deposits can be removed. Similarly, a gasket failure does not automatically require replacing the entire strainer housing.
Saifilter’s removable strainer elements can use a perforated metal cylinder as the screening surface or as support for a woven stainless steel mesh. The practical maintenance benefit is that the filtering layer, supporting structure, and seating areas can be examined individually, making it easier to distinguish cleanable deposits from damage that requires replacement. The exact element construction must be confirmed for the installed unit.
How Do You Clean a Removable CDU Strainer Screen?
Clean a removable metal screen by recording its operating condition, isolating and depressurizing the designated branch, removing the element, cleaning it with an approved method, inspecting it, and reassembling the housing to its specified configuration. The following field workflow is for qualified personnel and must be matched to the actual CDU and site procedures.
What Should You Check Before Opening the Housing?
Confirm the correct filter, an approved isolation plan, and a safe coolant-handling method before loosening any service closure.
- Identify the assembly. Record the CDU and loop, strainer model, element identification, flow direction, service-cover type, and relevant drawings. Confirm which equipment will be affected by isolating that branch.
- Capture a baseline. Record upstream and downstream pressure, strainer ΔP, flow, coolant temperature and concentration, pump status, valve position, and active alarms under stable operating conditions.
- Prepare the service area. Check that there is enough clearance to withdraw the full element, that suitable seals and spare elements are available, and that tools and handling materials will not introduce contamination.
- Isolate and make the housing safe. Follow the approved shutdown, lockout, isolation, draining, and pressure-verification procedure. Never loosen a clamp, threaded cover, or other closure on a pressurized housing.
How Should You Remove and Clean the Screen?
Withdraw the screen through its designated service opening and use only cleaning methods compatible with its metal, mesh construction, and coolant requirements.
- Remove the closure and element. Follow the drawing for the installed configuration. Protect the element ends, gasket seat, and fine mesh from scratches or deformation during withdrawal.
- Document the contamination. Record the location, approximate quantity, and appearance of collected debris before washing. Unusual or recurring material may require separate coolant or solids analysis; appearance alone does not identify its source.
- Remove deposits without damaging the screen. Use the approved flushing fluid and cleaning procedure. A non-damaging brush may be suitable for some perforated elements, while delicate woven layers may need a gentler method. Avoid unapproved cleaners, abrasives, or rinse water that could contaminate the cooling loop.
- Inspect the cleaned element. Check openings, welded joints, perforated supports, end fittings, seating faces, and seals. Replace any part that fails the applicable acceptance criteria.
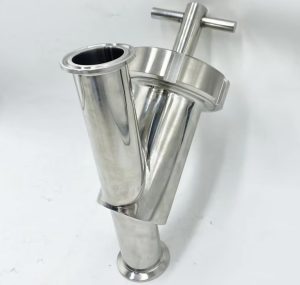
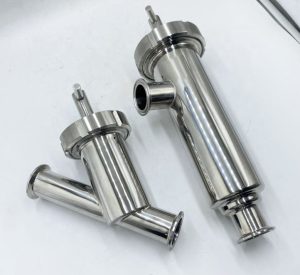
The housing design determines where the screen can be extracted. In Saifilter’s welded Y-type strainer, the screen is accessed through a chamber angled from the main flow path. The welded straight strainer retains coaxial inlet and outlet connections and provides access to its removable cylindrical element through the service end. Both arrangements allow the element to be inspected without removing the housing from the pipeline, provided the installation has sufficient extraction clearance and the branch has been safely isolated.
How Should You Reassemble the Strainer?
Refit only a verified screen and compatible seals, then close the housing according to the approved assembly drawing and service procedure.
- Confirm the element’s insertion direction, end geometry, support position, and seating. Do not substitute a similar-looking screen based on diameter or mesh count alone.
- Inspect and fit the specified gasket or O-ring; check its condition, material compatibility, and seating surface.
- Reinstall the closure with the prescribed fasteners and tightening method. Protect the cleaned assembly from foreign material until the circuit is ready to return to service.
A removable element simplifies access for manual inspection and cleaning. It does not make the strainer hot-swappable or safe to open under pressure.
Can a CDU Strainer Be Serviced Without Shutting Down Cooling?
Cooling can continue during strainer service only if the approved system design provides another path that maintains the required flow and protection while the filter branch is isolated. A quick-opening cover or removable metal screen does not, by itself, permit online maintenance.
A qualified bypass, duplex filtration arrangement, or redundant pump and filter branch may support planned maintenance without interrupting the protected load. The alternate path still needs enough capacity and the required filtration performance. The operating sequence must follow the equipment and site instructions, including confirmation that the target housing is depressurized before opening.
If the CDU has only one usable flow path and no approved alternative, schedule a maintenance window rather than bypassing protective filtration informally. This distinction matters when specifying service access for a Saifilter manual pipeline strainer: its cleanable construction supports element removal after isolation, while cooling continuity is determined by the surrounding system.
What Should You Check After CDU Strainer Maintenance?
Before accepting the strainer back into service, verify correct assembly, leak-free containment, restored flow, and pressure-drop readings under stable conditions. A completed cleaning step is not enough to prove the filter branch has returned to its expected condition.
Follow the approved restart sequence and confirm:
- Mechanical assembly: The element is fully seated, the specified gasket and closure are installed, and drains and vents are returned to the required positions.
- Coolant containment: Refill and vent the circuit using the approved procedure, then check the housing and connections for leakage.
- Hydraulic operation: Confirm pump and valve status, required flow, upstream and downstream pressures, and any active filter or cooling alarms.
- Comparable ΔP: Measure the cleaned strainer’s pressure drop after conditions stabilize and compare it with the clean reference at a similar flow and coolant state.
- Maintenance evidence: Record debris observations, cleaning fluid and method, defects found, components replaced, service date, and post-maintenance readings.
A useful maintenance record contains asset ID, loop, screen part or drawing number, coolant, flow, temperature, ΔP before and after cleaning, observed damage, and the return-to-service approval. Keeping these fields consistent helps distinguish gradual fouling from changing operating conditions at the next inspection.
If the pressure loss remains elevated after cleaning, do not reset alarms or approve a new threshold simply to clear the warning. Investigate the cause first.
Why Is CDU Strainer Differential Pressure Still High After Cleaning?
Persistent high ΔP after cleaning can result from remaining debris, incorrect element installation, changed flow or coolant conditions, a measurement error, or resistance elsewhere in the measured section. Identify which condition applies before replacing the screen or changing its opening.
| Finding after restart | Check first | Next action |
| ΔP is higher, but flow is also higher than at the clean baseline | Flow and pump operating point | Compare readings at matched conditions |
| ΔP is unexpectedly high at comparable flow | Remaining deposits, screen seating, obstruction, or element construction | Inspect according to the approved maintenance process |
| Sensor readings conflict with flow and equipment behavior | Pressure taps, sensor calibration, units, and measurement locations | Verify instrumentation before diagnosing the element |
| The screen blocks again soon after cleaning | Solids captured and upstream contamination | Investigate the debris source and coolant cleanliness |
| ΔP is near zero despite confirmed flow | Bypass or valve position, sensors, and screen integrity | Verify the flow path and inspect if indicated |
A finer mesh is not an automatic solution for recurring contamination. Reducing the opening can increase resistance and loading frequency, and it may change the mechanical requirements of the element. The correct response depends on the particle source, the protected equipment’s retention requirement, and the available pressure-drop budget.
How Do You Specify a Replacement CDU Strainer Screen?
Specify a replacement screen by its housing fit, end geometry, actual aperture and support construction, material compatibility, and operating limits. Pipe size or mesh count alone does not confirm that a replacement is interchangeable with the existing element.
| Specification to record | Required detail | Why it matters |
| Housing identification | Model, approved drawing, installed location, flow direction | Identifies the element and seating arrangement |
| Element geometry | Outside diameter, overall length, end fittings, seating surfaces | Determines mechanical fit and sealing |
| Screening medium | Perforated-hole diameter or mesh count plus wire diameter, weave, and clear aperture | Defines the physical screening opening |
| Support construction | Perforated cylinder, mesh attachment, wall thickness, mechanical design | Supports the screen against operating loads |
| Materials and seals | Metal grade, gasket material, coolant composition | Allows corrosion and seal-compatibility review |
| Hydraulic and service limits | Flow, operating pressure, temperature, allowable ΔP, removal clearance | Confirms suitability for the actual installation |
Saifilter’s pipeline strainer range includes 304 and 316L stainless steel options, removable metal elements, and 10–400 mesh reference configurations. Perforated metal can provide coarse screening or support a finer woven layer. This is useful when a replacement must match both the screening opening and the strength of the existing element, rather than simply repeat the same mesh label.
For a specific reference construction, the Saifilter screen table lists 200 mesh with 0.053 mm wire diameter and a 0.074 mm clear aperture (74 µm). That value describes the screen opening; it is not a verified absolute filtration-efficiency rating. The approved element design must still meet the system’s actual particle-retention and hydraulic requirements.
Housing shape also affects replacement compatibility. Saifilter’s angle-type strainer turns the flow through 90 degrees and uses an element arrangement specific to that housing. Its removable screen cannot be assumed to fit a Y-type or straight-through body. The approved drawing, end geometry, seal, and flow direction take precedence over nominal size or appearance.
For a technically meaningful replacement request, provide the installed housing drawing, existing element dimensions, photographs of the end fittings and seating surfaces, screen construction, coolant information, flow and pressure conditions, and the required opening. The replacement decision is complete only when both fit and operating suitability have been confirmed.